“Design thinking” has become a bit of a buzzword in recent years and is often used interchangeably with the term “human-centred” design.
And while I'm not personally a big fan of the term itself - as design is, by nature, an intellectual practice that follows a methodology so putting "thinking" next to "design" is redundant - I appreciate that its use can help when communicating what is involved in the process of designing with non-designers as there is a widely-held misconception that design is only the final look and feel that came out of an artistic expression.
So, what is “design thinking”?
No matter how you prefer to refer to it, when talking about “design thinking”, you’re likely referring to the creative process that designers go through when problem solving and coming up with ideas to improve user experiences - be that processes, products, services, or the built-environment - whilst at the same time accounting for business goals, technological feasibility and economical viability.
The design thinking process can also be used to decide between a strategic or tactical design approach for product development projects.
When you think about ‘design’ - and product design in particular - a non-designer will usually default to thinking about visual design (the user interface). But this is just the tip of the iceberg; design thinking encompasses a whole process, which starts with understanding and designing the user experience (UX).
It’s this common misconception that leads to Design being left out of strategic conversations and only being brought into projects once others have decided on the solution that they want to develop.
However, in doing so, a key stage of the design process is likely to be missed: properly understanding the problem that needs solving.
Identifying the right design solution for the right problem
This is where the Design Council’s Double Diamond framework is a useful tool as it forces you to identify and define the exact problem you are trying to solve for, before you move on to the actual solution design.
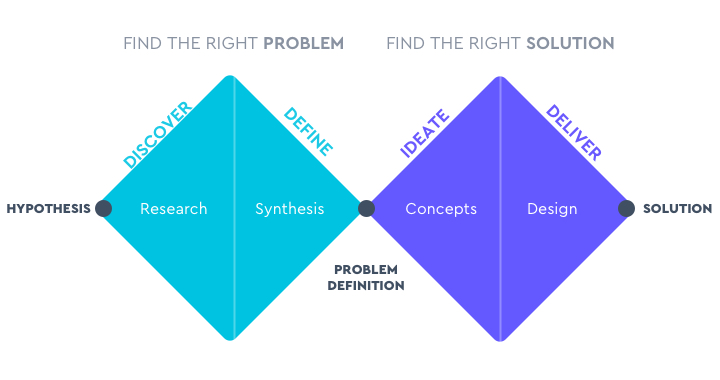
The double diamond
So, what does design thinking entail, exactly?
Understanding the design thinking process
Done correctly, the design thinking process begins with understanding the user and the problem before then moving on to creative problem solving and, finally, developing and putting into the practice the best design solution.
The process is broken down into 6 distinct stages, as follows:
Empathise
Define
Ideate
Prototype
Test
Implement
Stage 1: Empathise
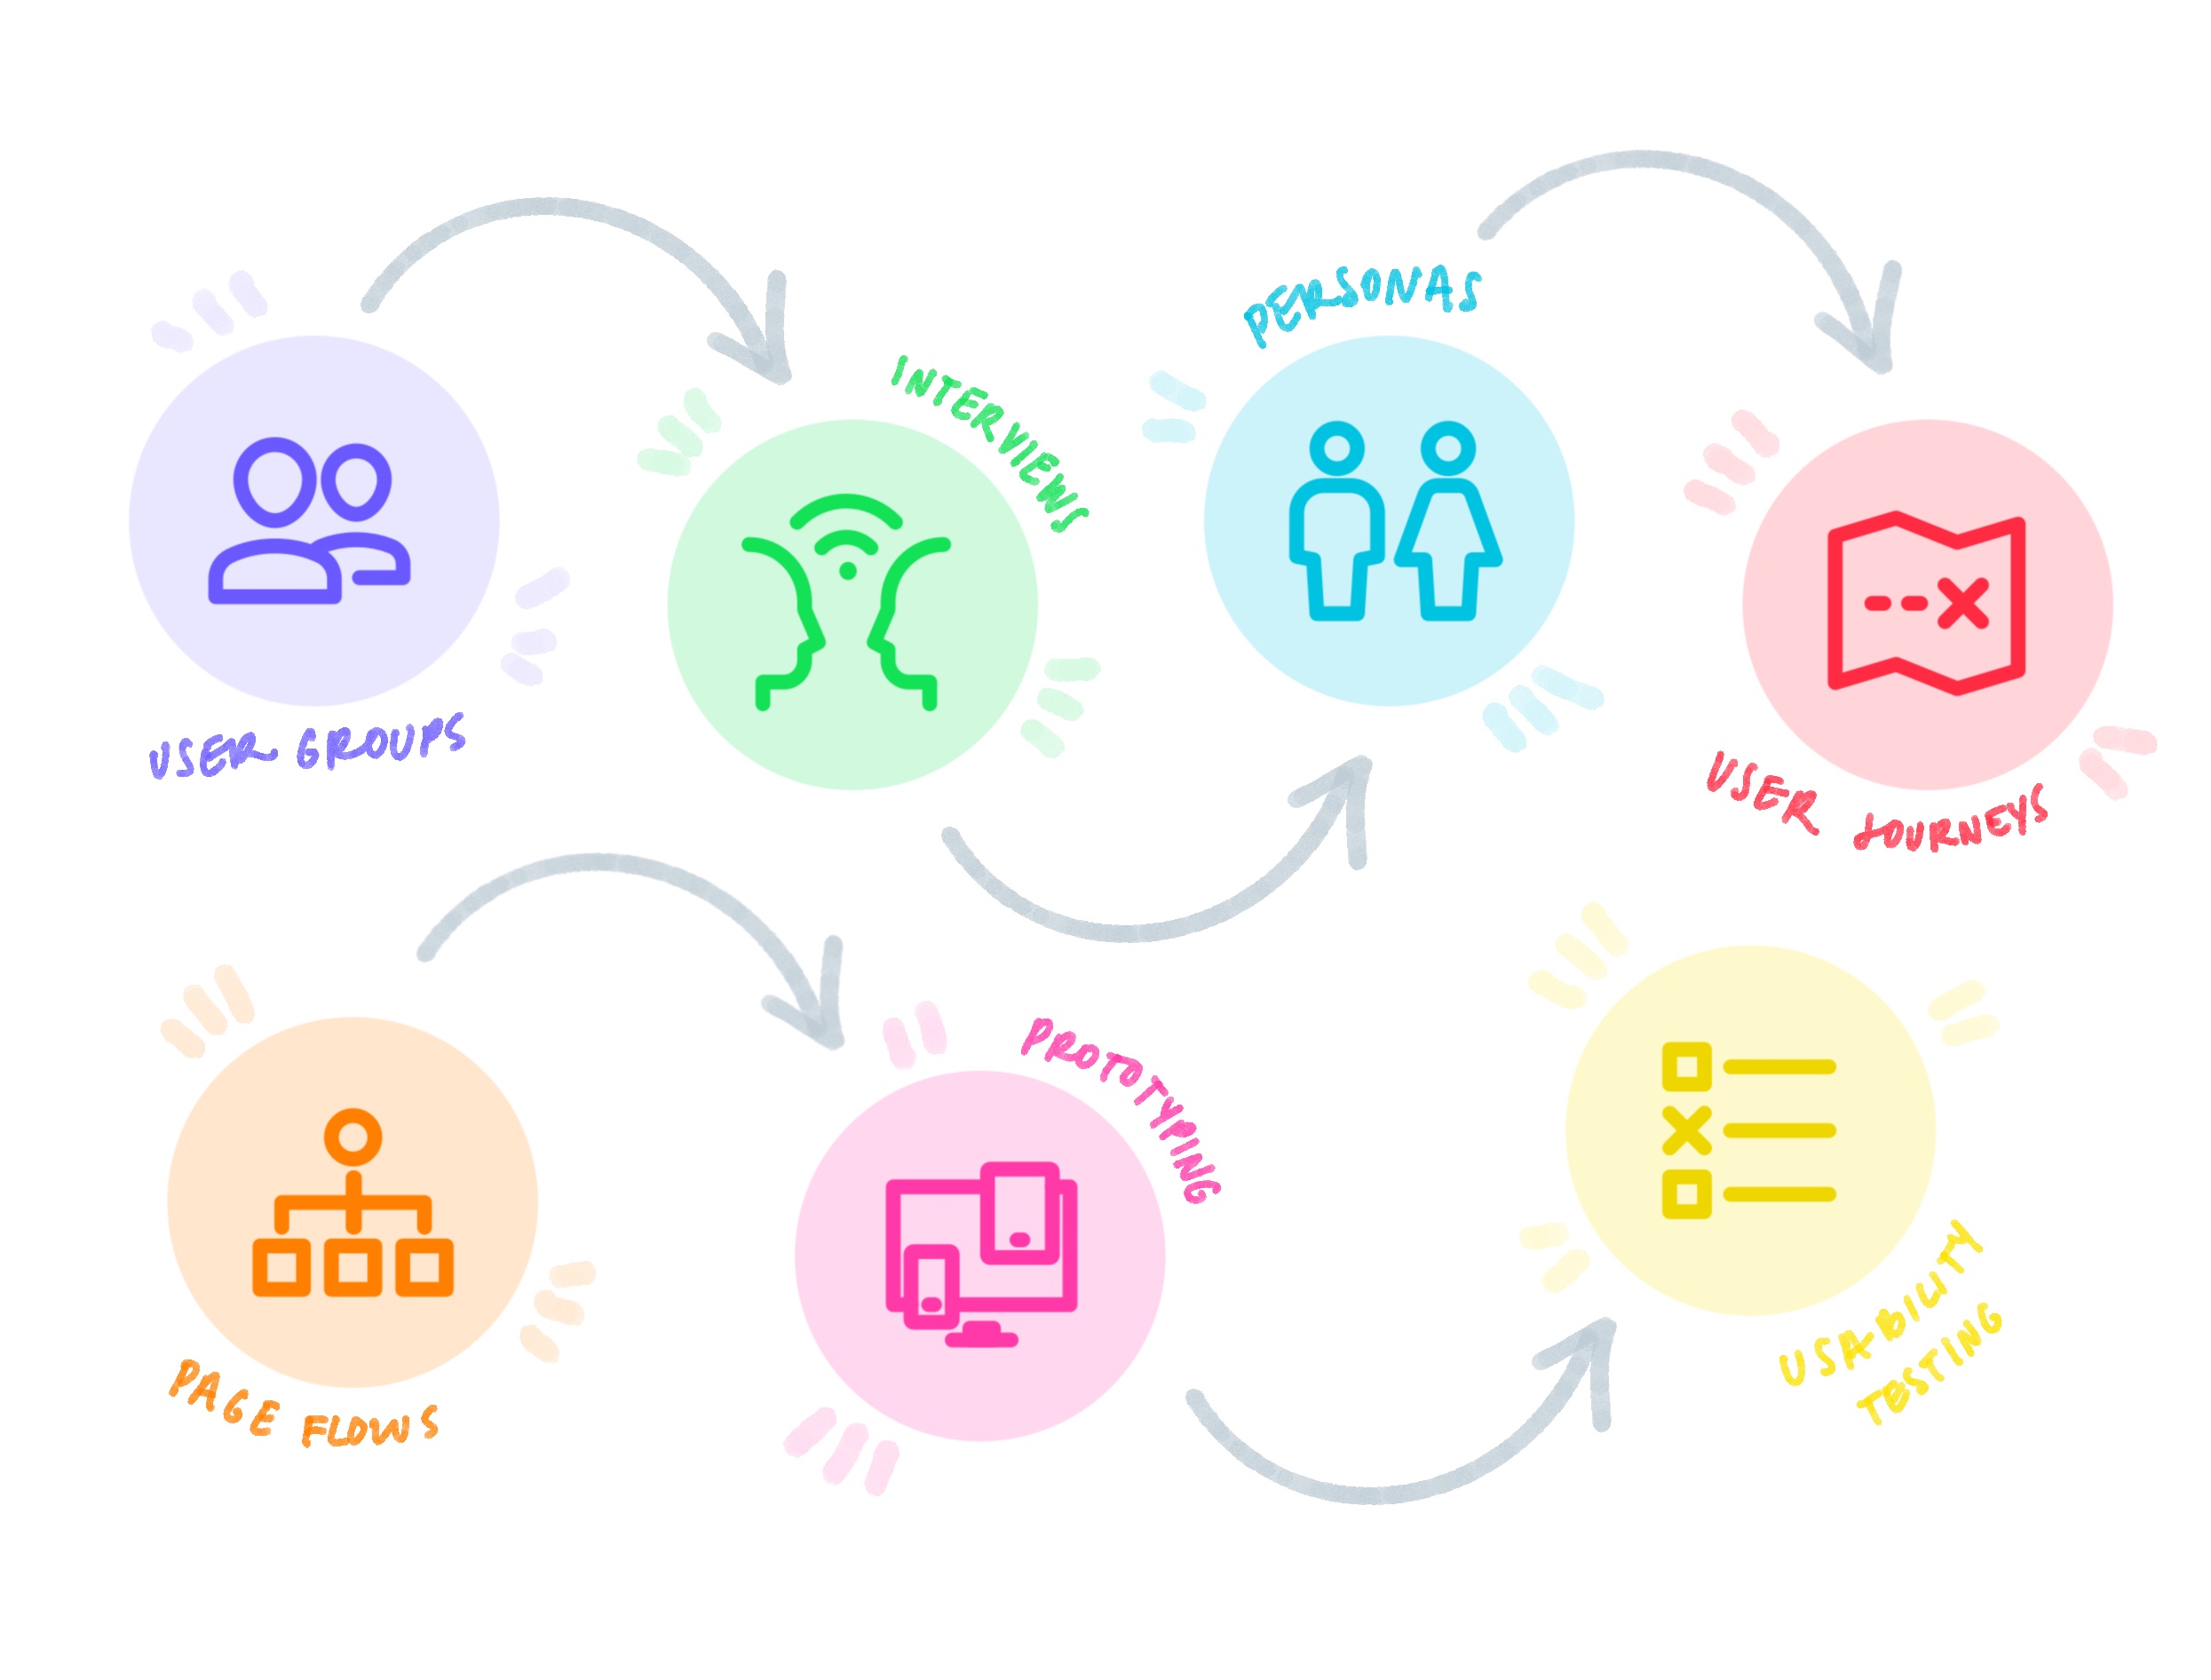
The first stage of the design thinking process is to research your users’ needs so you are able to understand the underlying problem.
You’ll need to work closely with your (prospective) users in order to fully understand their challenges and define the underlying problem and there are a whole range of research techniques at your disposal.
A user profile canvas allows you to dig deep into the unique persona(s) that your design needs to serve. This can then be expanded on through the use of an empathy map which allows you to put yourself in the shoes of your users, identifying what they are thinking and feeling; hearing, seeing; saying and doing; plus their pains and gains.
But it’s not enough to simply follow the Designing Thinking process and think that you’re empathising by just saying “As a user…” and doing a series of these techniques. You're not being user-centred and you're not involving users.
So the best way to truly empathise with users is to do research with the users themselves.
User interviews are by far the most common research technique, but if you’re unable to get time with your users directly, surveys or other forms of asynchronous feedback are better than nothing.
You’re ready to move onto the next stage once you’re able to frame the problem through the eyes of your (ideal) user.
Stage 2: Define
Once you’ve gained an understanding of your users and the real problem(s) you need to solve, it’s time to gather inspiration about what users really need and where there may be gaps and friction points in their current experience.
In this stage, techniques such as "affinity mapping" whereby you group similar ideas into clusters or categories (to help analyse the user research gained in Stage 1), and running stakeholder workshops are especially useful.
Stage 3: Ideate
When you’ve gathered what user research you can, it’s time to start challenging your assumptions and the status quo, and start exploring creative design solutions.
A brainstorming session - or sessions - whereby designers and other stakeholders (which could include the users themselves) come up with as many ideas as possible is the norm, here.
There are no right or wrong answers at this stage and you need to be careful not to fixate on detailing one or two solutions that might first come to mind at the expense of exploring a broader range of alternatives.
It’s important to explore outside-the-box ideas and to push the envelope, but not be afraid of questioning the obvious either, as the aim is to come up with lots of ideas of how to approach the problem. If you struggle to come up with ideas, the Crazy 8’s technique can help by challenging you to come up with 8 distinct ideas in 8 minutes.
It’s cheap and easy to make changes at this stage, and rough sketches on paper are a great low-fidelity means of drafting concepts before moving on to more advanced prototyping.
Stage 4: Prototype
By testing out some of the ideas you’ve come up with in prototype format, you not only make your ideas more tangible, but can also narrow down your options and hone in on the single solution that best meets user needs.
Prototyping can take many forms - from simple sketches, low-fidelity mock-ups and wireframes, to storyboards and videos, through to physical models. No matter what it is you’re designing, there will be a suitable method/medium that you can use.
By the end of this stage you will have identified which of your potential solutions is most feasible when taking into account any other potentially constraining factors (e.g. budget, timescale, technology, etc), and is ready for testing with actual users.
Stage 5: Test
At this stage in the design thinking process, it’s time to start testing your preferred solution(s) with real users to identify how well it meets their needs and what, if any, changes are needed.
Usability tests, observations, A/B testing, and online tests are all common ways to gather feedback on your designs in the real context with real users. Ensuring you design and document your test sequences are just as important as doing the tests themselves and can often take as long - if not longer than the actual ‘testing’ itself.
This stage in particular is one that you may have to repeat a few times in order to finalise a design that is both technically feasible and removes as many friction points as possible for users.
Stage 6: Implement
You’ll sometimes see people talk about design thinking as a 5-stage process, but that misses the all-important final phase: putting the best solution into practice.
Implementing your solution in the real world is the only way you’ll really know whether your design works or not, and is therefore a critical stage in the process.
(As a side note, here at Fruto, we’ll often advocate for regular implementation reviews to ensure that no important design details and final refinements have been missed out.)
If you’ve followed the process and given each stage the time and effort it needs, the majority of the time, any issues that do arise will be minor and quick to resolve. If you do find yourself needing to go back to the proverbial drawing board, going right back to Stage 1 and ensuring that you’ve correctly identified the real problem that needs solving is often the best place to start.
Human-centred design thinking: key takeaways
To summarise: design thinking is a 6-step process that helps keep your designs human-centred by putting the user and their needs at the heart of the solution.
When looking to create human-centred designs, the first question you should always ask yourself - and of others - is “what's the human need?”. Then make sure you keep referring back to this to guide your thinking throughout the design process to ensure you don’t lose sight of the specific problem your design needs to solve.
Experience tells us that there are then 3 key things that will ensure you’ve identified the best solution before you move onto when coming up with your design ideas:
Don’t skimp on research – for design solutions to be truly human-centred, they need to be informed by real research with real users, and taking shortcuts should be avoided where possible; a 30-minute conversation with the right people is far better than nothing at all.
(Don’t be afraid to) ask stupid questions – simply exploring the obvious/basic questions can help to identify potential solutions and it’s often the simplest ideas that are the best, so don’t start getting creative with potential solutions too soon.
Don’t underestimate the benefits of prototyping – prototyping not only helps you to identify any potential issues with the practicalities of implementing your designs, it’s also an effective way of communicating the design to stakeholders, allowing them to get hands-on and buy-in to the user experience before you move into the full build.
So now you know the basics, let’s take a look at how to put this into action and explore what the end-to-end UX design process looks like…