If you’re wondering how to follow a user experience design process and why it is so important to do so?, you’re not alone, and it’s not surprising either with all the buzzwords and techniques that are used by those working in and around the industry.
The trouble is, often you’re left not really knowing how to actually put a UX design process together. So in this post, we’re going to go behind the scenes and share the process that we use here at Fruto - as well as a quick template to help get you started.
By the end of it, you’ll hopefully understand a bit more about what exactly a good UX design process entails - and why the order that you do things is so important.
But before we start, there’s one other thing that needs clarifying because although the two terms are often used interchangeably, they are actually two different things...
What’s the difference between UX and UI design?
Whereas user experience (UX) design focuses on the overall experience that users have when using a digital product or service, user interface (UI) design focuses on the specific assets the user will interact with within the interface.
UX and UI do go hand-in-hand and the best result for a digital product or service will depend on these both areas working together. So although both terms are related, and there is overlap between them, they are not interchangeable.
Research first; design second
On any design project, there is a lot of uncertainty to begin with, but as we research and create concepts, things start to become clearer. And eventually you end up with a great design.
As the Double Diamond design model (created by the Design Council) illustrates, you first need to find the right problem... and define it well.
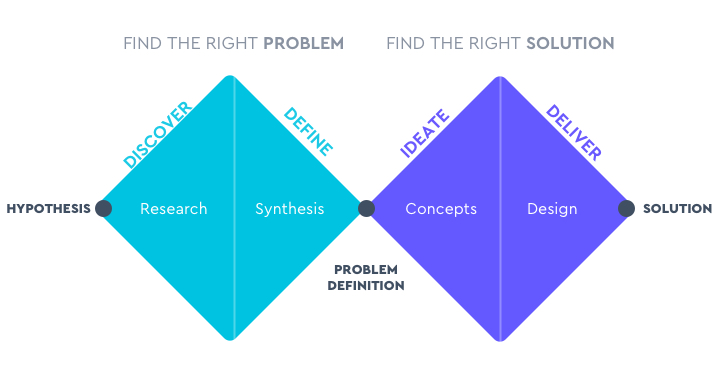
A good solution comes from a good process. By completing a discovery phase first, you ensure that you’ve got all the information you need to hand before you start to tackle the solution.
One thing you won’t see a good designer do is jumping to a solution. We first step back, understand the problem, and then come up with possible solutions.
If you don’t do your research first, you can very easily end up designing a product or a feature that doesn’t add value to users, so they might end up not using it. Which, as the godfather of UX, Donald Norman puts it:
"A brilliant solution to the wrong problem can be worse than no solution at all: solve the correct problem."
Donald Norman
Indeed, in recent years, UX design has gone from largely being an afterthought (akin to “putting lipstick on a pig”) to a prerequisite. You only need to take a quick look at the pace at which tech companies are acquiring design companies to see this change manifest itself, as reported in the yearly Design in Tech Report, by John Maeda.
And it’s not only high tech companies that are moving from the old way to the new way of thinking either; even the UK Government’s Digital Service provides guidance that includes putting user needs first.
The key elements of user experience design
A useful tool to help understand exactly why user interface design comes after user research, is Jesse James Garrett’s “Elements of User Experience” framework.
This model provides a great illustration of how all the different components of the UX design process work together, and the order in which they (need to) take place: starting with identifying user needs, and ending with the visual design.
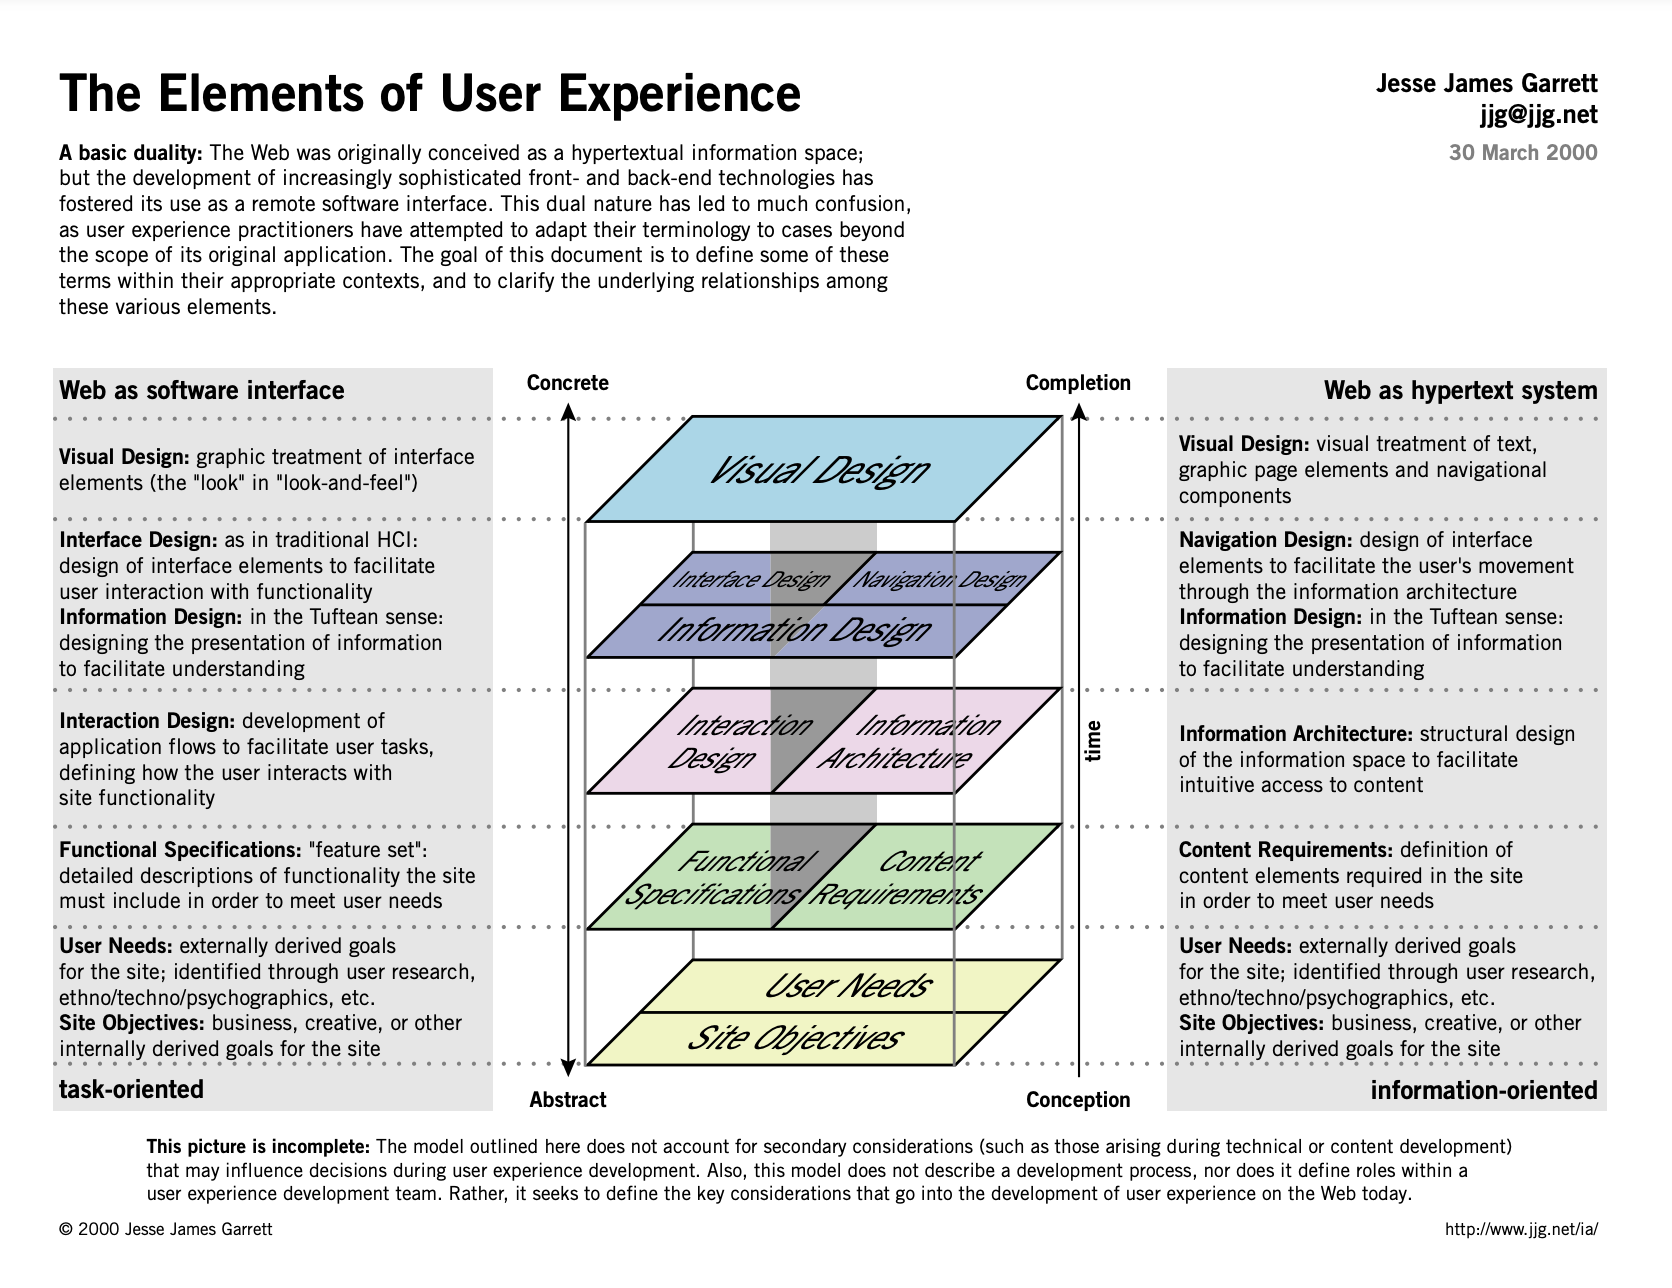
The elements of user experience by Jesse James Garrett
So, now you understand the difference between UX and UI design - and the importance of tackling each element in the right order - let’s take a deeper dive into the tried-and-tested UX design process that we use here at Fruto…
Fruto’s UX design process: How we design for great user experience
At Fruto, we follow a lean and iterative UX design process, typically starting with a discovery phase followed by a series of mini design cycles focused on user research, prototyping, and usability testing.
The specific UX design techniques we utilise on projects varies on a case-by-case basis, depending on the project objectives, what information we need to learn and other project-specific factors - such as budgets and timelines.
This vast toolbox of techniques includes such activities as user and stakeholder interviews, ethnographic research, usability audits, quantitative analysis, competitor analysis, card-sorting exercises, and UX workshops*.
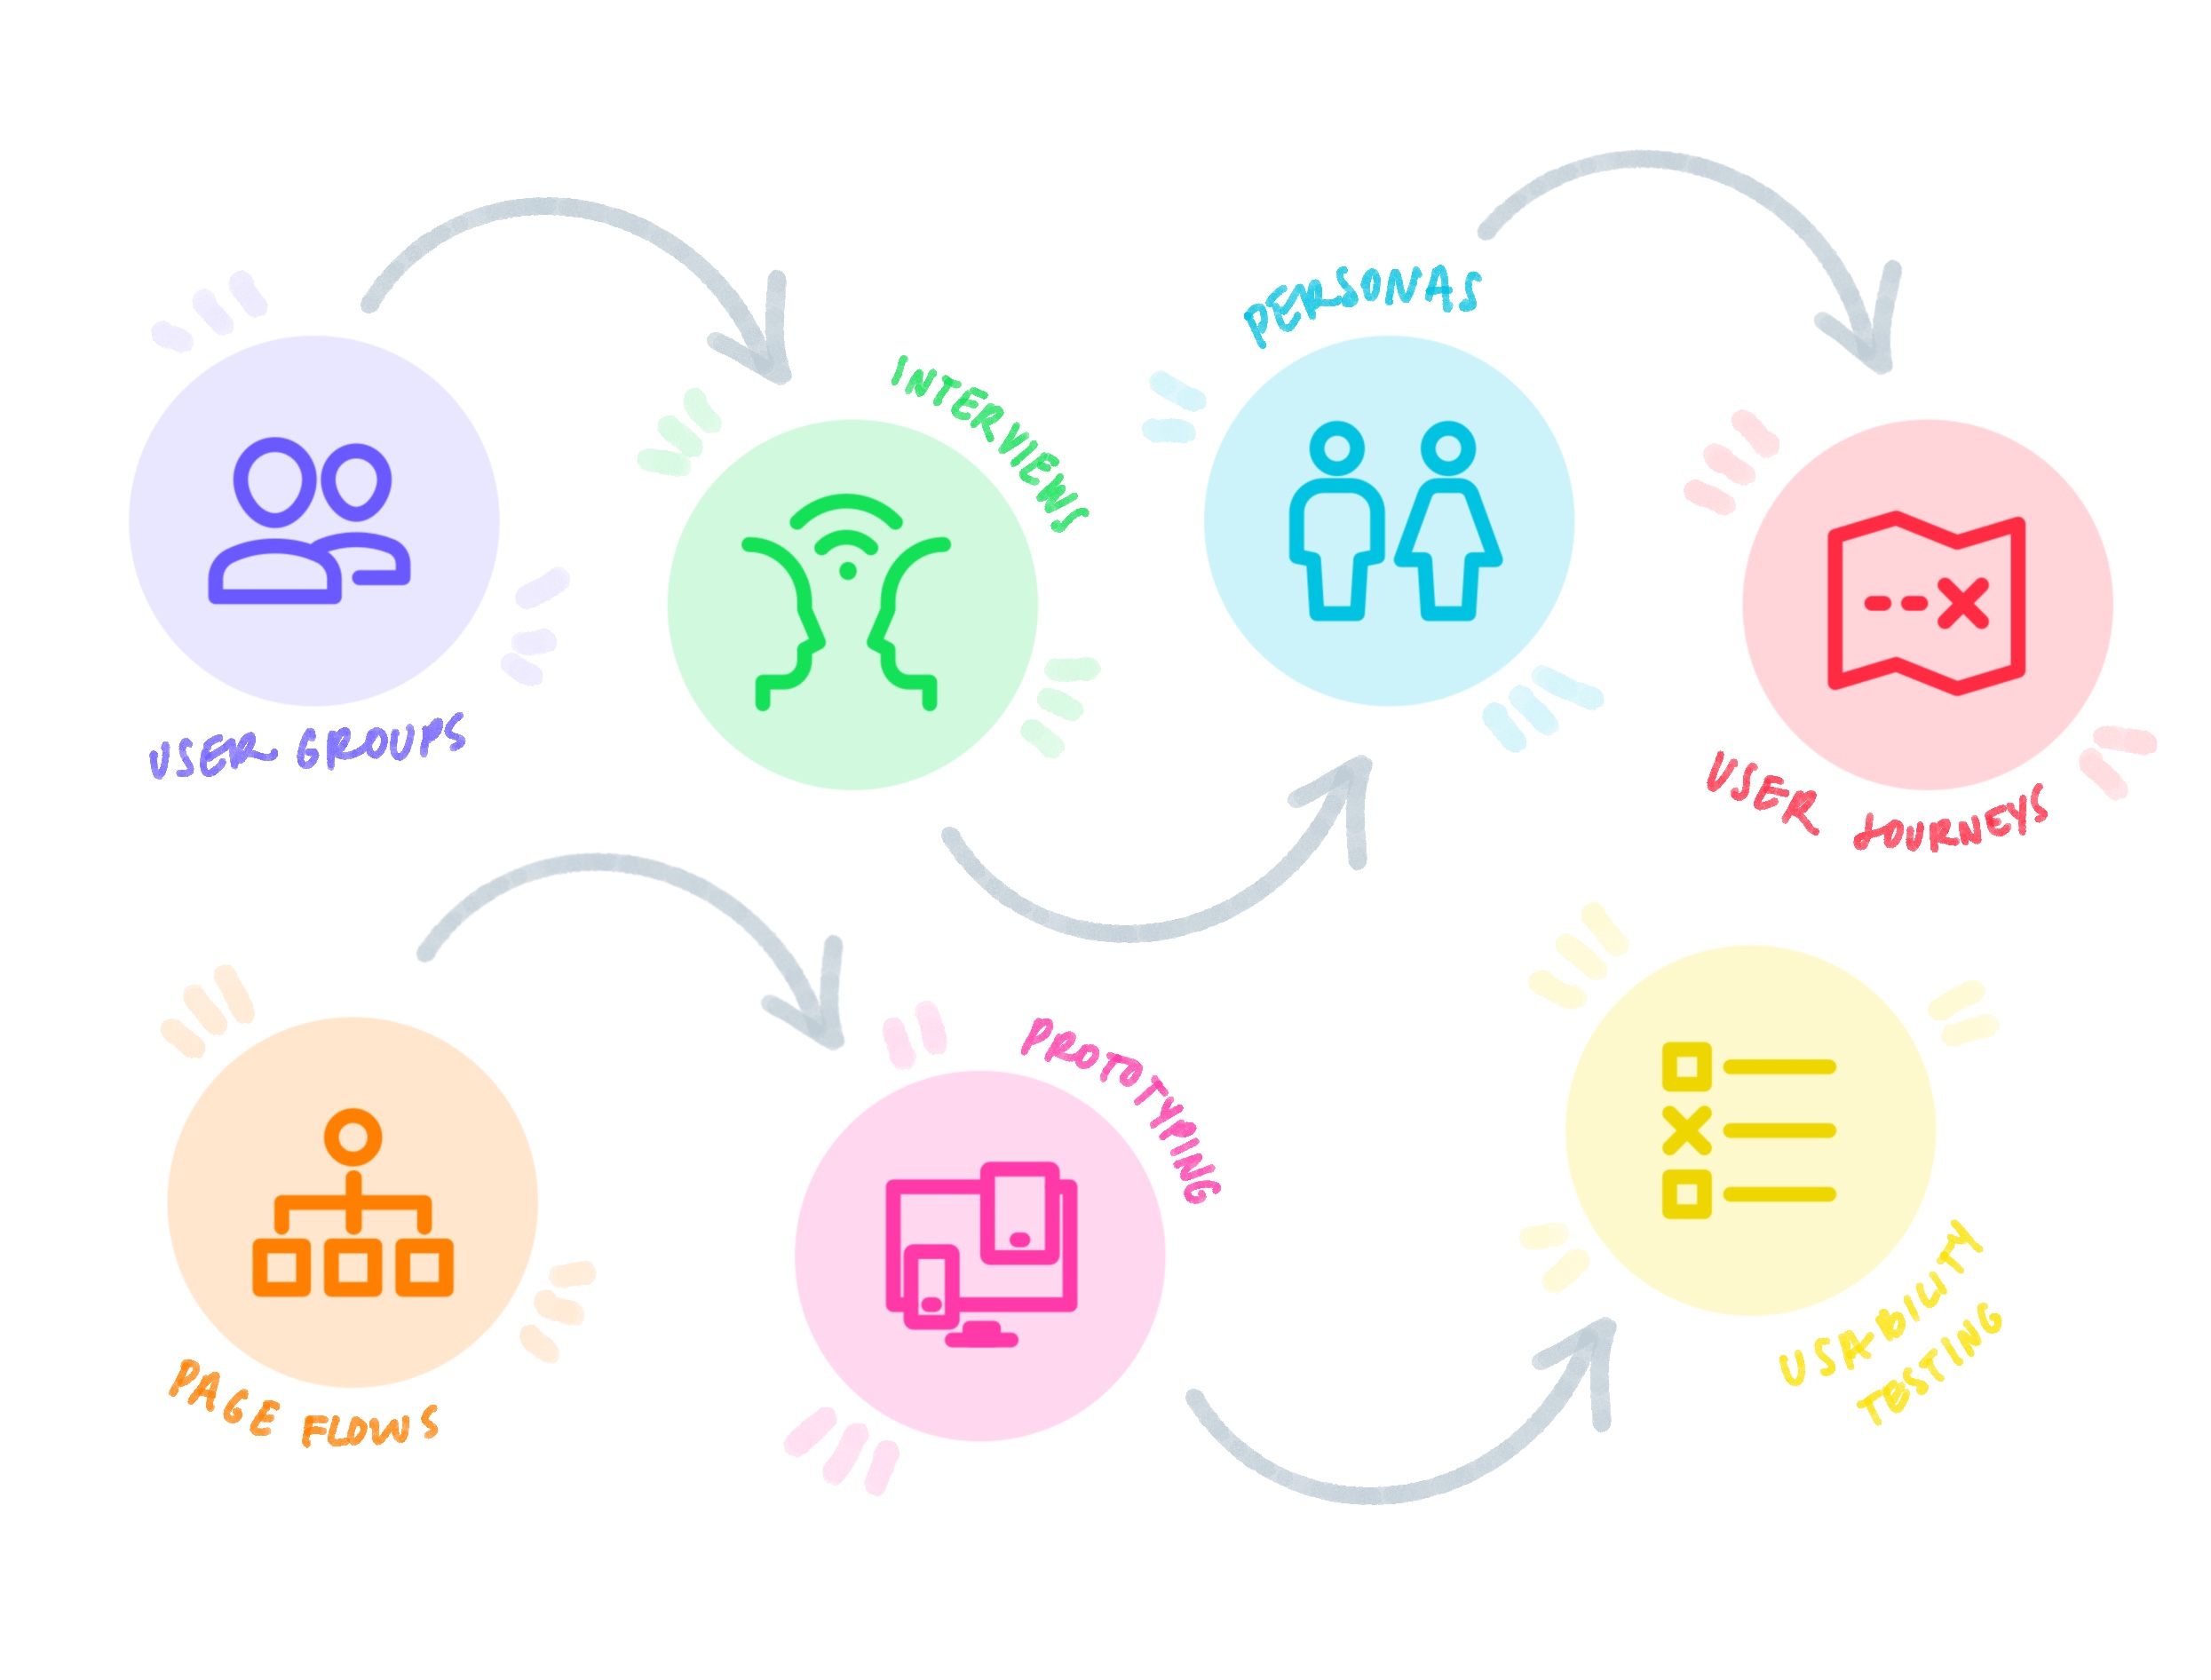
Projects will commonly follow the same 7-step process containing some fundamental UX techniques, before we finish it with the visual design:
Discovery
Step 1: Identify user groups
Step 2: Run user interviews
Step 3: Create personas
Step 4: Map out user journeys
Design & test
Step 5: Map out page flows
Step 6: Create a prototype
Step 7: Run usability test
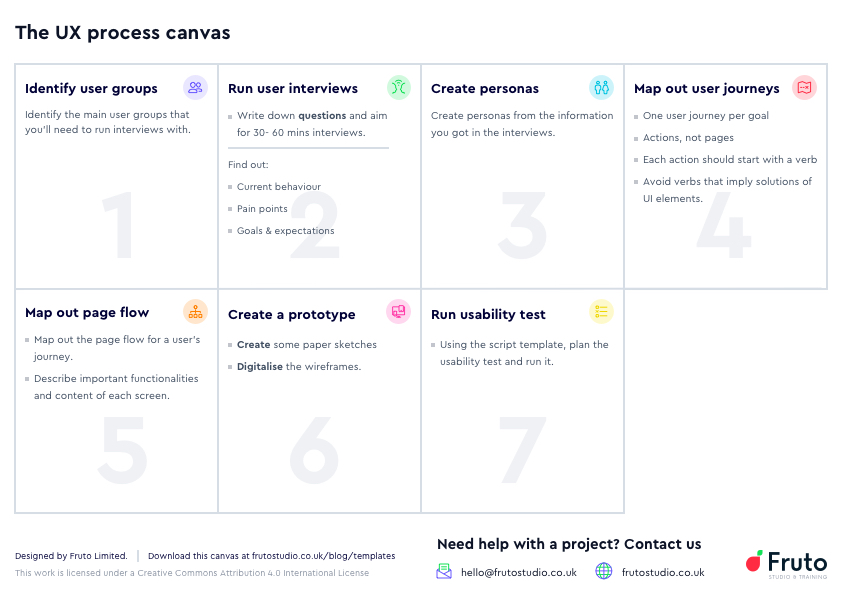
The UX process canvas
Download a template of our UX Process Canvas from our templates library
We also have a version of the template on Miro - an online collaborative whiteboard platform. We find Miro an excellent tool for running user experience workshops. Fruto are recognised by Miro as Miro Experts and you can download a free UX workshop Miro template.
Step 1: Identify user groups
In this first step, the aim is to identify the main user groups that we need to run interviews with so that we get a good cross-section across all the potential end users.
The number of user groups can vary depending on the project. For example, if we’re designing a medical app, we might have user groups of GPs/practitioners, registrars and other sub-groups, as well as the patients themselves.
As a good rule of thumb we aim to interview 5-7 users per user group, but depending on what is being designed, it may sometimes be more.
Step 2: Run user interviews
We then move on to running user interviews. These are semi-structured, one-to-one sessions lasting 30-60 minutes each (but if time is tight for some key users, we’ll take 20mins if that’s all we can get!).
The aim of these interviews is to understand users in depth and find out what their current behaviours, pain points, goals and expectations are. As such, we try to make the interviews conversational in style so that the interviewees feel comfortable sharing their honest thoughts and feedback.
At the end of this user research study, we then write a lean report containing the findings which we present back to the project stakeholders.
Step 3: Create personas
Once we’ve got the qualitative data from the user interviews, a good way to summarise the findings in a way that is easily accessible to the team and throughout the process is personas.
Having these personas helps to put you in the mindset of the different user types as you consider all the potential user journeys.
Step 4: Map out user journeys
Using the personas we create in step 3, we then move on to mapping out the user journeys, with one user journey per goal.
The user journey map has several layers but we’ll only use the layers that are relevant to the specific project that we’re working on. (You can download a free mental model mapping template here.)
When mapping expected user journeys, we’re looking to understand users' mental models - i.e. how they think about achieving the task.
There are two ways that we’ll typically approach this activity, depending on the project; either mapping out the expected user journeys (i.e. what the ideal journey is for the users); or mapping out the current user journey (i.e. their actual journey, as is).
When creating the map, we first want to identify three key things:
The trigger - what triggers the user to start the process
The goal - what the user is trying to achieve
The behaviour(s) - the actions the user expects to (or currently) take
The journey is then mapped out from users’ initial thoughts and needs before they even access the particular product/service in question. We’ll then look beyond their touch-points with the product to understand the context they are in, and identify the potential opportunities of customer need currently going unfulfilled that our solution needs to resolve.
Step 5: Map out page flows
Only once we’ve mapped out the user journeys do we move onto mapping out how the system will be designed to match the mental models we created in the previous step.
In this stage, we’re describing the key functionalities and content needed on each step, and in what order they need to appear.
Step 6: Create a prototype
Only once we’ve mapped out the page flows with the architecture of the app are we able to start designing the details of each page by creating wireframes and clickable prototypes. These usually start with low-fidelity paper sketches before moving on to more, higher-fidelity prototypes.
At this stage, we’re defining the content, functionality and layout of each page, and the user flow between pages. A prototype helps bring clarity by making the ideas more tangible and inviting collaboration from across the team.
Prototypes are often used to communicate a vision to stakeholders, investors and potential customers. They also help us to validade our initial ideas with real users before implementing the product.
Step 7: Run usability test
This stage enables us to test whether the screens and flows we’ve created deliver on their objectives.
We are looking to test whether the user is able to complete the task that they set out to achieve, if there are any issues or confusion created by the flow of the page, and to answer any questions that each user group may have.
Just like in user interviews, these are one-to-one sessions lasting 30-60 minutes each where we give tasks to users and ask them how they would go about completing them while thinking aloud. During the sessions, we follow our research script and we observe and take notes. (Check out this great example of a usability test session by Steve Krug if you’re not sure how to go about these interviews.)
Steps 6 (prototyping) and 7 (usability test) are often iterative: prototype, test, prototype, test. If the usability testing suggests something isn’t right, we revise the prototype, then test again, until it is.
Then comes the visual UI design
Only once we’ve completed these tests and analysed the results can we then move on to the actual visual design, where we make the refinements of the user interface by applying branding and making it more visually engaging.
As with UX design, there’s a process we follow - and for good reason - when it comes to the UI design too. We’ll be adding a new post with details on that shortly, so keep an eye on our social channels(LinkedIn and Twitter) for updates.
Want to level-up your UX design skills?
If you’re interested in learning more about UX design processes, keep an eye out for our next free UX design training session. We run these periodically throughout the year - just register your interest in the session(s) you’re interested in and we’ll let you know as soon as new dates become available.
Alternatively, if you want something a bit more bespoke, we also offer in-person and online in-house training for your organisation. If you’re interested in finding out more and getting a quote, please get in touch.